


Visualization doesn’t require long sessions or special equipment. Just 2–5 minutes a day can help calm the nervous system, lower stress, and make hard moments feel more manageable.
The five practices in this post each fit a different kind of stress. Some help settle the body during acute anxiety. Others help prepare for an upcoming stressor. One targets stress that shows up physically first — in the jaw, shoulders, or chest — before it registers mentally.
The clearest way to choose: match the practice to the timing.
Need to calm down now? → Safe-place imagery, calming scene recall, or body scan imagery
Need to prepare for upcoming stress? → Future-self rehearsal or coping rehearsal
Best for beginners? → Safe-place imagery
One caution that applies to all five: if imagery increases distress rather than reducing it, stop and work with a licensed clinician before continuing.
For a practical introduction to mental rehearsal and how visualization builds resilience — before diving into each of the five practices below — the video below offers a useful starting point:
How To Visualize Your Success: Mental Rehearsal To Build Resilience
Quick Comparison
| Practice | Best for | Time | Main use |
|---|---|---|---|
| Safe-Place Imagery | Acute stress, overwhelm | 3–10 minutes | Calm the nervous system |
| Future-Self Rehearsal | Upcoming stress, low confidence | 5–10 minutes | Practice steady responses |
| Calming Scene Recall | Midday stress, sensory overload | 3–5 minutes | Fast grounding |
| Body Scan Imagery | Muscle tension, body-based stress | 5–15 minutes | Release physical tightness |
| Coping Rehearsal | Hard conversations, presentations, appointments | 3–5 minutes | Practice response and recovery |
How Visualization Supports Emotional Resilience
Mental imagery can spark body responses that look a lot like real experience. That matters because it can help support emotional resilience, and you can see those effects in the five practices below.
At the body level, mental imagery activates the parasympathetic nervous system — helping slow heart rate, loosen muscle tension, and shift out of fight-or-flight mode. It can also build self-awareness and shift your sense of coping from ‘I can’t handle this’ to ‘I have the tools to get through this’.
The time commitment is small. Even 2 to 5 minutes a day can help build consistency.
One caution here: if imagery increases distress, stop and use it only with a licensed clinician.
A Quick Comparison of the 5 Practices
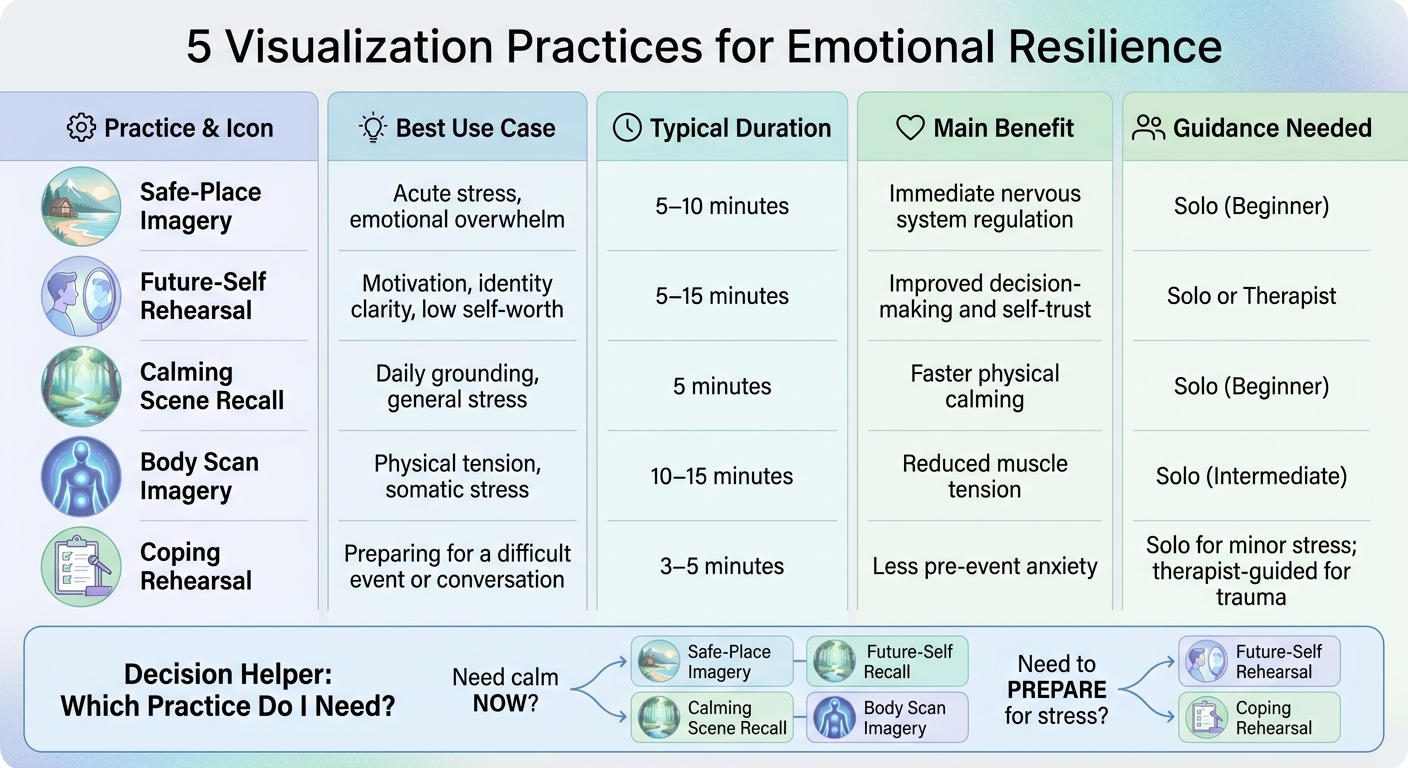
Not every practice works for every situation. This table shows where each one tends to help most.
| Practice | Best Use Case | Typical Duration | Main Benefit | Guidance Needed |
|---|---|---|---|---|
| Safe-Place Imagery | Acute stress, emotional overwhelm | 5–10 minutes | Immediate nervous system regulation | Solo (Beginner) |
| Future-Self Rehearsal | Motivation, identity clarity, low self-worth | 5–15 minutes | Improved decision-making and self-trust | Solo or Therapist |
| Calming Scene Recall | Daily grounding, general stress | 5 minutes | Faster physical calming | Solo (Beginner) |
| Body Scan Imagery | Physical tension, somatic stress | 10–15 minutes | Reduced muscle tension | Solo (Intermediate) |
| Coping Rehearsal | Preparing for a difficult event or conversation | 3–5 minutes | Less pre-event anxiety | Solo for minor stress; therapist-guided for trauma or intense anxiety |
Use this chart to match the practice to what’s happening right now. The sections below walk through each one in simple steps.
1. Safe-Place Imagery
Close your eyes and picture a place that feels calm and secure. It might be a beach you’ve visited, your childhood backyard, or a made-up spot like a quiet cabin in the mountains. Pick a place that feels peaceful and doesn’t connect to upsetting memories. When your body feels keyed up, this can be one of the fastest ways to help it settle.
This kind of mental imagery can help nudge the body into a calmer state, including slower breathing and a lower heart rate. The more specific the scene, the easier it is to step into it. Add one or two sensory details, like the sound of waves, the smell of pine, cool air on your skin, or the feel of a blanket, to make the image feel more immediate.
Use it during acute anxiety, after conflict, or before bed. Most people do well with 3 to 10 minutes, and once the image feels familiar, even 2 to 3 minutes can act like a quick reset. With regular practice, your body starts to settle faster each time you return to the same place.
For general stress or sleep support, this works well for beginners. If you’re dealing with trauma or PTSD, it’s best to use it with a trauma-informed therapist.
When the goal is to get ready for a stressor rather than calm down from one, move to future-self rehearsal.
2. Future-Self Rehearsal
Unlike safe-place imagery, future-self rehearsal helps you build steadiness before stress shows up. You mentally practice an upcoming challenge, like a performance review, a hard conversation, a medical appointment, or a major life change, and picture yourself handling it with composure. The point isn’t to do it perfectly. It’s to make calm, steady responses feel familiar before the moment arrives. Vivid rehearsal can activate brain pathways similar to those used in actual experience, which is part of why it can help you get ready for pressure.
A typical session lasts 5 to 10 minutes. Start with slow breathing. Then picture the event, move through one hard moment, see yourself responding calmly, and finish with the situation resolved. Daily practice in the days before the event tends to help more than one long session.
This approach helps build a rehearsed response. In plain English, that can lower anticipatory anxiety and support behavior that is more thoughtful and less reactive under pressure. It works well on your own for everyday stressors. If the event is tied to trauma, attachment wounds, or severe dysregulation, therapist-guided support with CBT or DBT is a better fit.
For stress you can see coming, rehearsal tends to work better than calming imagery. If you want something simpler for grounding, the next option uses a calming scene instead of a future event.
sbb-itb-23f89d4
3. Calming Scene Recall
Unlike future-self rehearsal, calming scene recall helps in the moment. Use it when stress starts to build during a busy workday, after conflict, or in an overstimulating setting.
Go back to one familiar scene, like a beach, a forest trail, or a cabin. Then add 2 or 3 sensory details: sound, smell, temperature, or touch. Those small details make the scene easier to return to. With practice, the scene becomes a faster cue for calm.
This works well for rising stress, sensory overload, or a quick reset. Try it for 3 to 5 minutes, or practice for 2 to 3 minutes each day when you’re already calm so it’s easier to reach when pressure hits. Self-guided use is fine for everyday stress, but if imagery brings up distressing memories, use trauma-informed support.
If stress tends to show up more as body tension than mental overload, body scan imagery is the next step.
4. Body Scan Imagery
Stress doesn’t always look like racing thoughts. Sometimes it lands in the body first: a clenched jaw, tight shoulders, or pressure in the chest. Body scan imagery is useful for that kind of stress. It pairs slow attention through the body with simple images, like warmth or soft light, to help tension ease. The point isn’t to force anything to shift. It’s to notice what’s there without trying to fix it.
This practice often begins at the toes and moves upward. As you move through each area, you might picture a warm light melting tightness or a gentle heaviness settling into the muscles.
When to use it: Best when stress shows up in physical ways, such as muscle tension after a long day, restlessness, sensory overload, or chronic pain.
How long it takes: About 5 minutes can help in the moment. A fuller 10- to 15-minute session gives you time to move through the whole body. Using it before bed can help make it a steady habit.
Primary resilience benefit: Regular practice builds body awareness and can help you notice stress sooner.
Guidance needed: Many people can begin with a script or audio guide. Trauma survivors and people with dissociation should work with clinician support, since body-focused imagery can feel destabilizing.
If your stress is linked to a specific event, move next to coping rehearsal.
5. Coping Rehearsal
When a stressor is clear and coming soon, coping rehearsal is less about settling your body in the moment and more about practicing what you’ll do. If you can see the stress coming, you can walk through the trigger, your response, and your recovery before the event happens.
Focus on three parts:
- the stress point
- your coping response
- your recovery
It also helps to add a setback and practice how you’ll recover from that too. The point isn’t to run through a perfect script. The point is to make recovery feel familiar. Done with strong mental detail, this kind of rehearsal can make the situation feel known ahead of time, which can help a calm response happen more automatically under pressure.
When to use it: Before important presentations, performance reviews, hard family conversations, or stressful medical appointments.
What it helps: It helps make calm responses more automatic under pressure.
Clinical guidance: For day-to-day stress and performance situations, this can be a self-directed practice. If the stressor involves past trauma, work with a trained clinician. That kind of imagery work needs professional support so it doesn’t become destabilizing.
How These Practices Fit Into a Mental Health Care Plan
After you choose a practice, the next step is figuring out where it belongs in your care plan. For many people, visualization works best alongside psychotherapy, medication management, nutrition support, sleep hygiene, and regular movement. Used this way, imagery can help calm the nervous system and make it easier to take part in the rest of care. In practice, clinicians adjust imagery based on a person’s symptoms, trauma history, and goals, and they pace exercises with care so the practice stays within a tolerable range.
Visualization also pairs well with CBT, DBT, and EMDR. In those settings, it can support follow-through and help reduce emotional reactivity. Put simply, it can act like a bridge between insight and daily behavior.
When visualization is part of a coordinated care plan — alongside psychiatry, therapy, nutrition, and movement — it tends to produce more consistent results than when used in isolation.
For most people, the best results come from brief, repeated practice. Consistency matters more than duration. Just 5 to 10 minutes, 4 to 6 days a week, is enough to build momentum. If you already have a provider, ask where imagery fits into your plan.
Once you know where visualization fits, use the tips below to start simply and stay consistent.
Tips for Getting Started
To make repetition count, start with one practice. Stick with it for at least 7 days so the image feels familiar when stress hits. If you keep changing techniques, it gets harder to build an image you can actually use.
Keep it short at first: 2 to 5 minutes a day is enough. What matters most is doing it often, not doing it for a long time.
Before you begin, take 3 slow breaths to settle yourself.
Once the routine feels steady, add a little detail to the image. Use 2 or 3 sensory cues like sound, smell, temperature, or texture. That helps the scene feel more real and easier to return to.
A simple way to stay on track is habit stacking: do the practice for two minutes right after brushing your teeth. And if the image starts to feel activating, stop and switch to a safer scene. That keeps visualization simple, repeatable, and easy to fit into daily care.
Conclusion
These five practices help your nervous system rehearse calm before stress hits. That could mean a fast reset, physical release, or a mental walk-through of a hard moment. The best fit comes down to timing: do you need to settle down now, get ready for what’s next, or recover after stress?
Visualization is a practical way to rehearse calm, coping, and recovery. When used alongside clinical care, it can help turn insight into action. Pick the practice that fits your situation, then stick with it. Start with one and repeat it every day.
Ready to Build Visualization Into a Real Care Plan?
These five practices work best when they’re part of a broader approach — one that accounts for your symptoms, history, and what else is already in place. At Modyfi, our Root-Cause Psychiatry approach brings psychiatry, therapy, nutrition, and exercise together so visualization and other mind-body tools can be integrated into care that’s built around you.
👉 Explore Providers to Book an Appointment and Start Your Care Plan
(Note: Modyfi proudly accepts most major commercial insurance plans. We do not accept Medicare or Medicaid.)
FAQs
How do I choose the right visualization practice?
Choose based on your goal and how wound up you feel:
- Overwhelmed: try a 2–5 minute micro session, like safe-place imagery or sensory grounding
- Anxious about a future event: use mental or coping rehearsal
- Lingering stress: go with the container exercise or body scan imagery
- New to visualization: start with a safe-place practice
Keep sessions short. It also helps to track your mood and stress on a 0–10 scale, so you can spot what’s helping and what isn’t.
If you have trauma, PTSD, or dissociation, consult a professional first.
What if visualization makes me more anxious?
If visualization makes you feel more anxious, stop the session right away.
These practices are usually safe, but vivid imagery can sometimes feel upsetting if the content is triggering or the pace moves too fast.
Pause if you notice:
- a racing heart
- breathlessness that doesn’t settle
- flashbacks
- nightmares
- dissociation
Put your comfort first, and reach out to a licensed mental health professional for guidance.
Can visualization replace therapy or medication?
No. Visualization can help with stress relief and emotional regulation, but it is not a treatment on its own for clinical conditions.
Therapy and medication deal with deeper mental health needs through professional care. Visualization works best as a support tool alongside that care, not as a replacement.
How long does it take for visualization to work?
It depends on what you mean by “work” — and that distinction matters.
For immediate effects like lowering heart rate or reducing acute stress, even a single 2–5 minute session can produce a noticeable shift. The nervous system responds to calming imagery relatively quickly when the practice is done with focus and sensory detail.
For building emotional resilience over time — the kind that makes calm responses more automatic under pressure — research on mental rehearsal and guided imagery suggests consistent daily practice over several weeks is when the more durable benefits tend to emerge. Most studies measuring resilience outcomes use intervention periods of 4 to 8 weeks.
The honest answer is that consistency matters more than session length. Five minutes a day, six days a week, will produce better results than occasional longer sessions. If you’ve been practicing for two to three weeks without any noticeable shift, that’s worth discussing with a clinician — it may be that a different approach or professional guidance would help.
Can visualization help with anxiety attacks?
It can help — but with an important distinction between anxiety attacks and clinical anxiety disorder.
For acute stress and rising anxiety that hasn’t yet reached a full panic state, calming visualization techniques like safe-place imagery or body scan imagery can help activate the parasympathetic nervous system and interrupt the stress escalation before it peaks. Used consistently as a daily practice — not just in the moment — they can also lower the overall baseline of stress reactivity over time.
However, visualization is not a treatment for anxiety disorder. If anxiety attacks are frequent, severe, or significantly affecting daily life, a clinical evaluation is the right next step. Visualization works best as a support tool alongside professional care — not as a replacement for it. And if imagery itself triggers distress or escalates anxiety rather than reducing it, stop immediately and consult a licensed clinician before continuing.
What is the difference between visualization and meditation?
They overlap — but they work differently, and the distinction matters when choosing which one fits your situation.
Meditation typically involves training attention without directing the mind anywhere specific. The goal is often to observe thoughts, sensations, or the breath without getting caught up in them — cultivating present-moment awareness and non-reactivity. Many forms of meditation actively discourage engaging with mental content.
Visualization does the opposite — it deliberately directs the mind toward a specific image, scenario, or outcome. Rather than observing what arises, you’re constructing something: a safe place, a future event, a coping response. The mental engagement is intentional and content-specific.
Both can reduce stress and support emotional regulation. The practical difference is this: meditation builds the capacity to be with whatever arises; visualization builds specific mental rehearsal skills and calming associations. Some people find visualization easier to start with — particularly when the mind tends to race during open awareness practices — because the directed focus gives the mind somewhere specific to go.